The ADO NET source consumes data from a .NET provider. We configure the ADO NET source by providing the SQL statement that defines the result set. The ADO NET source uses an ADO.NET connection manager to connect to a data source, and the connection manager specifies the .NET provider.
The ADO NET source has one regular output and one error output.
Some important properties:
SqlCommand: The SQL statement that the ADO NET source uses to extract data.
AllowImplicitStringConversion: The default value is TRUE. A value that indicates whether the following occurs:
- No validation error occurs if there is a type mismatch between input column and output column for strings (DT_WSTR or DT_NTEXT).
- Implicit conversion of input columns to the string data type that the output column uses.
The output and the output columns of the ADO NET source have no custom properties.
The following example uses ADO NET source. In this example, like earlier we will copy data from Employee table into Employee_new table. Before moving ahead with example, refer these earlier articles:
Create a new SSIS project using BIDS / SSDT
Data Flow Task
Let’s first TRUNCATE or DELETE data from Employee_new table that was created in referenced articles above.
Open SSISStudy / SSISStudy2012 project created earlier. Open Source Explorer and right click on SSIS Packages and select New SSIS Package and rename it to ADONetSourceExample.
Drag and drop Data Flow Task into Control Flow area. Open Data Flow Tab. Drag and drop ADO NET Source into Data Flow area.


Edit and configure the ADO NET Source to copy data from Employee table in AdventureWorks database.


 Choose the data provider from among the list.


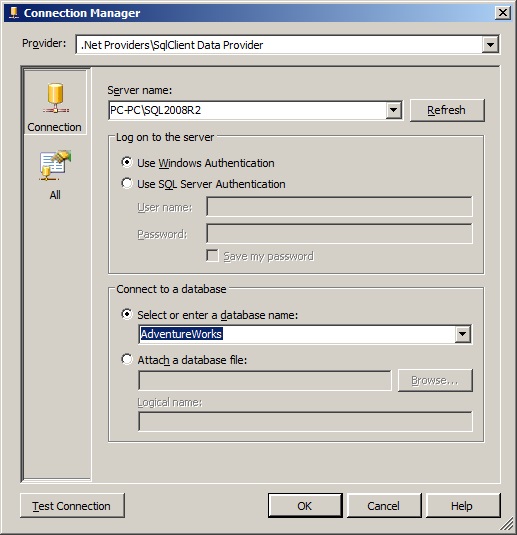

After testing the connection and when we reach back to ADO.NET Source Editor window, from Data access mode select Table or view/SQL command.


If Table or view, it allows user to select the table to get the data.
 If SQL Command, it allows user to write the SELECT query used to get the data.
 We can directly write SELECT query to fetch data in the SQL command text or click on Build Query to open Query Builder and build our query. Also we can click on Browse to select the .sql file which fetches the data from the required table or view.


Steps to use Query Builder
Click on Build Query
 Click on Add Table button and select Employee(HumanResources) table and click Add button.

 Click on Close button.
Click on * (All Columns), to select all columns from the table. Click OK.
 Returning back, whatever method we choose to use to get the source data, select Columns in ADO NET Source Editor.


Like in earlier examples, drag and drop an OLE DB Destination and connect ADO NET Source to OLE DB Destination. We might be required to edit and configure OLE DB Destination. This is because we have created ADO NET Connection Manager in this example and OLE DB Destination requires OLE DB Connection Manager.
 Press F5 to test this package.
It 's an amazing and Very Nice,Thanks for sharing
ReplyDeleteDot Net Online Course Hyderabad