Data flow task is the first task in SSIS we will spend time on. This is because most of the work in SSIS would be revolving around this task. This task encapsulates the data flow engine that moves data between sources and destinations, and let the user transform, clean, and modify data as it is moved.
Data flow task can consist of combination of multiple sources, transformations and destinations. Each such combination runs as a separate thread. The order of execution of these threads is determined by the data flow engine. At run time, data flow task builds an execution plan for these threads and the data flow engine executes the plan. This can be thought of as similar with execution plan in T-SQL.
This article applies to Data Flow Task in both BIDS and SSDT.
Before we discuss further, we will quickly try out a small example. For this example, we will connect to sample AdventureWorks database which can be downloaded from Microsoft website. In this example, we will copy data from HumanResources.Employee table in AdventureWorks database into new table dbo.Employee_New. We have created a new table Employee_New using the script below:
Open SSISStudy / SSISStudy2012 project created in earlier articles or create new SSIS project. Create new package and rename as DataFlowTaskExample.dstx
Select, drag and drop Data Flow Task from Toolbox / SSIS Toolbox on Control Flow tab.
Right
click on the Data Flow Task on Control Flow area and select Edit. This opens up Data Flow
tab. We can also double click on the Data Flow Task on Control Flow area or even simply
select Data Flow tab.
In cases where we have multiple data flow tasks in our package, we can select particular data flow from the drop down.
From Toolbox / SSIS Toolbox, select, drag and drop OLE DB Source from Data Flow Sources on Data Flow tab.
Double click on OLE DB Source to open OLE DB Source Editor. We can also right click on OLE DB Source and select Edit to open the editor.
In the OLE DB Source Editor, select New button to open Configure OLE DB Connection Manager window.
Click on the New button to open the Connection Manager window. Select the SQL instance in Server name, Authentication mode and the database (AdventureWorks in our case) to connect. Click on Test Connection button. Successful connection should prompt the following message Test connection succeeded. Click on OK to proceed.
Keep clicking OK when prompted until we reach back to the OLE DB Source Editor window. Select Table or view under Data access mode. Select HumanResource.Employee listed under Name of the table or view.
Select Columns to see all the columns from the table or view. Check mark on Name to select all the columns or check mark only specific columns required as this source output.
Select Error Output. This shows the possible ways to handle error. Nothing much to do here now. Just click OK.
OLE DB Source is now ready to pull data from AdventureWorks table HumanResources.Employee.
Till now we have prepared SSIS package to copy data rows from HumanResources.Employee table. Now we have to prepare SSIS to insert these data rows in Employee_New table created in earlier steps. For this, select, drag and drop OLE DB Destination in the Data Flow tab.
Follow the steps below or simply select OLE DB Source and when green arrows appears at the bottom of the OLE DB Source, select the arrow, drag and drop on the OLE DB Destination to connect source and destination.
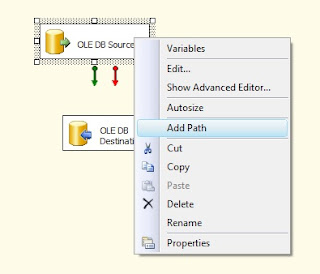
Right click on OLE DB Source created and configured earlier and click on Add path.
In the popup window, select OLE DB Source in From and OLE DB Destination in To and click OK.
In Input Output Selection window, select OLE DB Source Output under Output dropdown. Click OK. This should add a path between OLE DB Source and OLE DB Destination.
Double click on the OLE DB Destination in the Data Flow area to open OLE DB Destination Editor. By default, OLE DB Connection manager is configured to select the Connection Manager already created in the earlier steps.
Under Data access mode, select Table or view – fast load. Select Employee_New from Name of the table or the view.
Select Mappings. This shows the mappings between the source and destination. Basically it shows which source column data will be copied to which destination column.
Select Error Output. This is similar to Error Output we saw in OLE DB Source. Like source, it tells about the possible ways to handle errors in the destination. Click OK.
Now we are ready to execute this package. Either press F5 button on keyboard or click green start button at the top of the designer area to start debugging this SSIS package. This helps us to test our SSIS package.
Either press Stop button at the top to stop execution and return back to the design mode or click Package execution completed. Click here to switch to design mode, or select Stop Debugging from the Debug menu. when is appears. This signals package execution completion. However, it does not mention if the package execution succeeded or failed. Check Progress tab for the same.
Now select the new table Employee_New created earlier in SQL Server Management Studio and AdventureWorks database and we should see the data copied to this new table.
Congratulations, we have successfully completed our first SSIS package creation.
Click for NEXT article in the sequence.
Please feel free to correct me by commenting your suggestions and feedback.


 Either press Stop button at the top to stop execution and return back to the design mode or click Package execution completed. Click here to switch to design mode, or select Stop Debugging from the Debug menu. when is appears. This signals package execution completion. However, it does not mention if the package execution succeeded or failed. Check Progress tab for the same.


No comments:
Post a Comment